Want to save with Paschal? Don’t miss our current offers and specials

Want to save with Paschal? Don’t miss our current offers and specials

Want to save with Paschal? Don’t miss our current offers and specials
Return to Paschal Resource & Education Hub
Calling the pros for every plumbing issue in your home is time-consuming and costly. Now, don’t get us wrong: We love helping our Northwest Arkansas, Fort Smith River Valley & Southwest Missouri plumbing customers with problems big and small! But if you’re feeling empowered to DIY your simple plumbing issues, we’re here to help you do that, too.
No matter the pluming issue in your home, Paschal has you covered with our list of 10 plumbing hacks to help you live better.
Let’s say you have an overflowing toilet that just won’t stop or a busted pipe in your basement. Your first step is to shut off the water at the source! Knowing where your emergency shut-off valve is can save you a very expensive clean-up, water damage, and mold issues. Crawl-space with no basement – the shut–off valve is normally located near the water heater or under the kitchen sink in most homes, but could be placed anywhere within the home depending on construction constraints. If it’s positioned inside the crawl space, you may want to consider a second valve located in your living space, for example, near your water heater or under a kitchen sink.
Knowing how to use your garbage disposal correctly helps you avoid repairs and blockages. There are several things you should never put down your disposal:
While we’re talking about disposals, let’s talk about clogs. These steps can help you de-clog your disposal in record time.
1. Turn off the power, either by unplugging or turning it off at the circuit breaker.
2. Inspect the disposal with a flashlight. If you see an obvious clog, clear it with any long and sturdy tool. Never use your fingers!
3. If you don’t see an obvious clog, use a sink plunger. Fill the sink with a few inches of water and start plunging.
4. Use a DIY drain cleaner. Mix one part baking soda to one part vinegar, and pour the solution down the drain. Wait about 30 minutes, then turn on the hot water for about 60 seconds.
5. Turn the power back on and test it!
There’s a pretty simple DIY tip for keeping your disposal blades sharp and eliminating those weird smells. Every now and then, put several ice cubes and a hunk of lemon peel down the disposal. Run it without water for about 30 seconds, then run some water and add a little dish soap. You’ll have sharpened blades and a lemony scent in less than a minute!
Try this quick and easy hack to freshen up the funk.
Dump a few cups of ice into your sink. Cut up lemons or lemon peels are also a good idea to add if you have a few on hand.
Flip the switch to activate the garbage disposal. (Be sure it’s clear of any other debris first.)
Turn on your faucet or dump hot water into the sink.
Watch the magic happen! This simple process eliminates any nasty odors coming from your garbage disposal—and you’ll be able to see all the gunk before it washes down the drain. Adding lemons will give you a refreshing lemony scent emanating from your garbage disposal as well!
To keep your disposal clean and fresh, avoid dumping things like eggshells and potato peels in the sink. Toss ’em in the trash instead—they’re on our list of things to NEVER put down a garbage disposal.
We can’t stress this enough: Commercial drain cleaners are bad news for your plumbing. They’re too strong and corrode your pipes over time. A DIY cleaner is safer, cheaper, and just as easy. For major clogs, try pouring boiling water down the affected drain, followed by ½ cup baking soda. Let that sit for 5 minutes. Then, pour in a cup of vinegar and wait another 5 minutes. Flush with warm water.
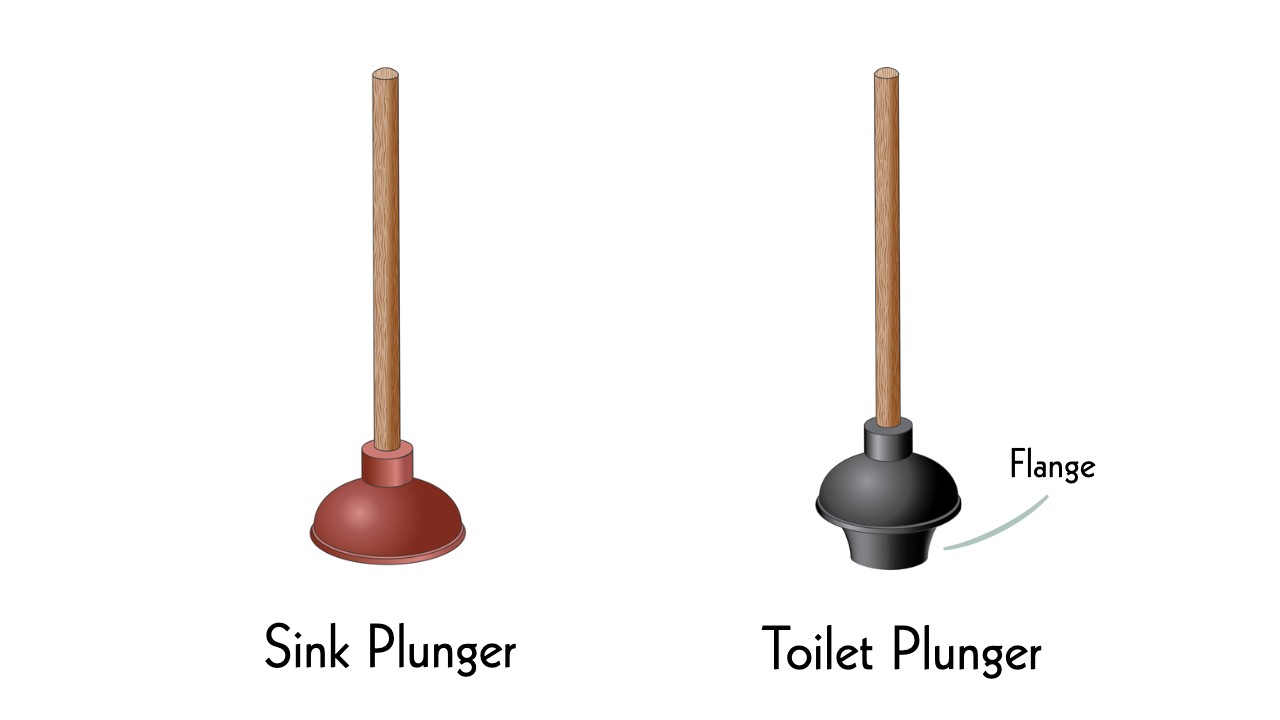
Your first pro-plumber move for tackling toilet clogs is to have a plunger for every toilet in your home. (The toilet kind with a flared base, not a sink plunger!) Usually, when people can’t fix a toilet clog using a plunger, it’s because they are using the wrong kind! When you’ve got an overflowing toilet, time is of the essence. You don’t want to be running upstairs for the only plunger in the house!
You can also fix a clogged toilet without a plunger! Stop the flow of water by disconnecting the chain in the tank or by turning off the water at the valve at the back of the toilet. Pour hot water—the hotter the better—into the bowl. Hot water and a little soap can also help break down a clog.
Have you ever received a massive water bill you weren’t expecting? Maybe, you notice water damage, mold, and poor water pressure. Sounds like you might have a leak… but really how can you know for sure?
Finding an invisible plumbing leak in your home can be tricky, but it’s definitely not impossible! Turn off all the taps and take a water meter reading. Wait a few hours with nobody using any water, and check the meter again. If it shows water usage, you definitely have a leak somewhere, and need to call in the pros.
Another common place for leaks? The toilet! Try putting food coloring in the tank. If there’s color in the bowl after 30 minutes, you’ve got a leak from the tank!
Low pressure leads to longer showers, which leads to higher bills. So why not lower your bill and have better pressure—by simply cleaning your shower head? Put a small plastic bag full of white vinegar over your shower head. Secure with a rubber band and leave overnight. This will remove any mineral deposits hanging around your shower head that could be clogging up the lines. If it still doesn’t work, unscrew your shower head (be sure to turn off the water first!) and soak in vinegar for another 24-48 hours. If you are still experiencing shower pressure issues, then it may be time to look into upgrading your water heater tank.
Threads on your pipes may get looser over time, which can lead to small leaks. For a quick DIY pipe tightener:
1. Turn off the water.
2. Unscrew the leaky pipes.
3. Wrap a single-layer of masking tape around the threads.
4. Screw the pipes back together.
A leaky faucet is an absolute nightmare of plumbing. Even though it’s one of the most annoying household problems, a leaky faucet can slip to the very bottom of our to-do lists again and again and again. To stop the constant drip-drip-drip, secure a washcloth around the faucet with a rubber band. Then, when you’re ready to tackle the issue at the source, turn off the water, remove the tap body, put in a new washer or O-ring, and reassemble. Done! The same thing works for leaky pipes, but you’ll want to put a bucket underneath as well.
We love helping you with your plumbing problems, big and small. Give us a call today for more plumbing tips and tricks!


© 2025 Paschal Air, Plumbing & Electric. All rights Reserved. Paschal Air: #TACLA00129951E • Paschal Plumbing: #M-44920 • Paschal Electric: TECL#81327 • Texas Department of Licensing and Regulations, PO Box 12157, Austin TX 78711 (512) 463-6599 • The Texas State Board of Plumbing Examiners, PO Box 4200, Austin TX 78765 (512) 936-5200 • Plumbing: #M-44920 RMP Joshua Gross